How to write a plugin
Simple plugin
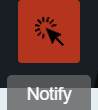
In this section, we will try to create a new plugin, called “button.example”, that will add a toolbar button which will show a notification when is clicked.
The purpose of this tutorial is to help you to better understand the idea of plugin, the steps that you need to follow, the structure and behavior of each component file, as they were explained in the Architecture chapter.
The first step will be to create the button.example folder inside the plugins directory.
Each plugin contains 2 special folders:
The first one is the data folder, that has to be copied exactly as it is created in the build folder of the program. This data directory will include all the images used to represent the components of a plugin (tool buttons, icons), but also other aditionals files needed in order to make your plugin run properly.
The second special component is the translations folder, which will contain the translatable key strings from your plugin, and also their translations.
More details about how the translation function works can be found here.
Only to exemplify the content of this folder, we’ll create the messages-en.json (english language) and messages-fr.json (french language).
In our index.js file, you can notice that we used 2 strings having the following format: ‘PLUGIN_STRING_TO_TRANSLATE’, more precisely: ‘EXAMPLE_BUTTON_NAME’ and ‘EXAMPLE_BUTTON_NOTIFICATION_TEXT’. It means that this key-strings have to be included in both our translation files.
As you can see in the Translations chapter, the value that the key string will receive has to be an object with 2 properties: message (the actual translation), description (a short definition of the string to translate).
By the end, your messages-ln.json (ln = language) files should look like this:
“messages-en.json”:
{
        "EXAMPLE_BUTTTON_NAME": {
                "message": "Notify",
                "description": "This button pops-up a notification."
        },
        "EXAMPLE_BUTTON_NOTIFICATION_TEXT": {
                "messages": "You have successfully created your button!",
                "description": "This is the notification text when the user clicks the button."
        }
}
“messages-fr.json”:
{
        "EXAMPLE_BUTTTON_NAME": {
                "message": "Notifier",
                "description": "This button pops-up a notification."
        },
        "EXAMPLE_BUTTON_NOTIFICATION_TEXT": {
                "messages": "Vous avez créé le bouton avec succès",
                "description": "This is the notification text when the user clicks the button."
        }
}
Then, we’ll add the package.json file. As mentioned before, the content of this type of file has to be an object with the following properties:
| Property title | Description | Required / Optional | Default value |
| name | the name of the plugin (“button.example”) | required | - |
| version | 0.0.1 | required | “0.0.1” |
| main | the main file of the plugin, that will be “index.js” | required | “index.js” |
| plugin | an object where we specify the characteristics of the plugin | required | - |
The properties of the “plugin” component are:
| Property title | Description | Required / Optional | Default value |
| consumes | we specify from which other plugins our plugin uses exported functions (required “workspace”) | required | [“workspace”] |
| provides | we specify if our plugin functions will be exported (“example_button”) | optional | [] |
| target | for which version of the program the plugin should be working: browser or electron | required | - |
Finally, the content of our package.json will be:
{
        "name": "button.example",
        "version": "0.0.1",
        "main": "index.js",
        "private": false,
        "plugin": {
                "consumes": ["workspace"],
                "provides": ["button_example"],
                "target" : ["browser", "electron"]
        }
}
The next step is to create the main file, called index.js.
If you already read this section, you probably noticed that in the index.js file we should’ve imported first the .vue files from the views folder. In this plugin tutorial, we only register a simple button, which means that we don’t need a .vue file to design a specific Vue component, so the views folder will also be missing.
Therefore, we’ll only need to initiate a studio variable to null and to create an empty object called button example.
After that, we have to export a setup function, its parameters being:
| Property title | Description | Required / Optional | Default value |
| options | additional options | optional | null |
| imports | all the functions that our plugin collects from the plugins that it consumes (in our case, the functions exported by workspace) | required | - |
| register | a function that will register the plugin object | required | - |
Inside this function, the studio variable instantiated before will receive the imports value.
After that, we need to register our button, so we’ll call the worskpace function registerToolbarButton, which will have the following parameters:
| ‘BUTTON_EXAMPLE_NAME’ | the name of our button, a key string that will be translated |
| 20 | integer number representing the priority of our button in the list of all toolbar buttons |
| () => studio.workspace.showNotification | the action that will be performed when the user clicks on this button |
| ‘plugins/button.example/data/img/button.png’ | the relative path to the image that will represent our button |
The showNotification function is also called from the workspace and its parameters are:
| ‘BUTTON_EXAMPLE_NOTIFICATION_TEXT’ | the key string that will be translated and will represent the text of our notification |
| ‘success’ | the notification type |
By the end, our index.js file should look like this:
let studio = null;
let button_example = {};

export function setup(options, imports, register)
{
        /* Collect the objects exported by the consumed plugins */
        studio = imports;

        /* Create a toolbar button that will display a notification */
        studio.workspace.registerToolbarButton ('EXAMPLE_BUTTON_NAME', 20,
                () => studio.workspace.showNotification ('EXAMPLE_BUTTON_NOTIFICATION_TEXT'),
                'plugins/button.example/data/img/button.png');

        /* Register the object that this plugin will provide */
        register(null, {
                button_example: button_example;
        })
}
As you noticed above, when we registered the image corresponding to our button, we specified its relative path, which includes some additional folders in our button.example plugin.
To test if you successfully created your first plugin, you have to rebuild the program using the 2 commands for electron npx webpack, then npm start.

If you want to test this plugin, you will have to search for “button.example” in the docs/examples folder and copy it inside the source/plugins folder, then rebuild the application to make the new plugin available.
How to create a device plugin
This type of plugin allows you to add and use a new device to the Wyliodrin STUDIO platform, so you need to properly register its functions and characteristics.
Let’s suppose that you want to create your own device plugin, called “device.awesome”.
The data folder should contain all the images that you need to represent the device (the icon displayed in the list of available devices) and its features (for example, the DeviceToolButtons), but also, if needed, the additional files that you’ll use to make your device run projects.
The views folder has to include every Vue component relied to your device, for example: disconnect, device settings or device manager dialogs.
For this example, we will create the AwesomeDisconnectDialog.vue component, that will contain the button that disconnects the device:
<template>
        <v-card class="disconnect">
                <v-tooltip>
                        <template #activator="data">
                                <v-btn @click.stop="disconnect" class="icon-btn" ref="reference">
                                        <img src="plugins/device.awesome/data/img/icons/disconnect-icon.svg" :alt="$t('DEVICE_AWESOME_DISCONNECT')" class="s24">
                                </v-btn>
                        </template>
                        <span>{{$t('DEVICE_AWESOME_DISCONNECT')}}</span>
                </v-tooltip>
        </v-card>
</template>

<script>
        /* The actual code goes here */
</script>
The script part will define the disconnect function and also an esc function, that will close the dialog containing the Disconnect Button when the user presses the ‘Esc’ key:
export default {
        name: 'AwesomeDisconnectDialog',
        methods: {
                disconnect ()
                {
                        /* Send the 'disconnect' tag */
                        this.$root.$emit ('submit', {
                                disconnect: 'disconnect'
                        });
                },
                esc()
                {
                        /* Emit the 'submit' signal from the child component to notify the parent that the dialog has to be closed */
                        this.$root.$emit('submit');
                }
        }
}
The package.json file will have the classic format, but if it’s necessary the “plugin” object will require an additional property, called “optional”, where you will specify if the plugin consumes the console or the mqtt plugins.
For the example created, it won’t be necessary, so the content of this file will be:
{
    "name": "device.awesome",
    "version": "0.0.1",
    "main": "index.js",
    "private": true,
    "plugin": {
        "consumes": ["workspace", "projects"],
        "provides": [],
        "target": ["electron"]
    }
}
The translations folder will also have the usual structure, including the messages-ln.json files with the unique keys that you used in your device plugin, for each language of the program.
{
        "DEVICE_AWESOME_DISCONNECT": {
                "message": "Disconnect",
                "description": "This button is used to disconnect a device."
        }
}
The main file index.js is the most important for this type of plugin, as its purpose is to include all the functions and characteristics that will make your device work.
You have to begin with importing all the Vue components that you created, and also all the modules and packages that your device requires in order to work properly.
For the “device_awesome” plugin, the header of this file could look like this:
/* Here you will import all the modules required for the functioning of your device */

import AwesomeDisconnectDialog from './views/AwesomeDisconnectDialog.vue';

import { EventEmitter } from 'events';
import { connect } from 'http2';

let deviceEvents = new EventEmitter ();

let awesome_module = null;

let studio = null;
let workspace = null;
let devices = [];

let awesomeDevices = [];

let connections = {};
After that, you will create the functions needed to search and update your device type:
loadDevice: uses a specialized module to scan the operating system of the client and search for your type of device.
function loadAwesome ()
{
        try
        {
                /* Any module that will allow you to find the type of device you have chosen */

                return require ('awesome_module');
        }
        catch (e)
        {
                studio.workspace.error ('device_awesome: Awesome is not available '+e.message);
                return {
                        list: function ()
                        {
                                return [
                                ];
                        }
                };
        }
}
listDevice: will try to return a list of the available devices, if they can be found.
async function listAwesome ()
{
        let ports = [];
        try
        {
                ports = await awesome_module.list ();
        }
        catch (e)
        {
                studio.workspace.error ('device_awesome: failed to list awesome '+e.message);
        }
        return ports;
}
updateDevices: simply call the workspace updateDevices function.
function updateDevices()
{
        workspace.updateDevices ([...devices, ...awesomeDevices]);
}
searchDevices: checks systematically the list with all the available devices found, trying to find those having the name or the description fitting your type of device, then adds a new object to the devices array, with the relevant properties: unique id, name, description, address, priority, icon, type of board, type of connection, and others additional options.
function search ()
{
        if(!discoverAwesomeDevicesTimer)
        {
                discoverAwesomeDevicesTimer = setInterval (async () => {
                        let awesome_devices = await listAwesome ();
                        devices = [];
                        for(let awesomeDevice of awesome_devices)
                        {
                                /* Search only for the devices that have the same specifications as your Awesome Device, array and set its properties.*/

                                devices.push(awesomeDevice);
                        }
                        updateDevices ();
                },5000);
        }
}
Inside the setup function, you first have to obtain the list of devices that fit your awesome type:
export function setup (options, imports, register)
{
        studio = imports;
        awesome_module = loadAwesome();
        search();

        /* Code explained below */
}
After that, you will create the object you will register and export for your plugin, its properties being the functions that will help the user manage your device on the Wyliodrin Studio platform:
defaultIcon: correlates a default icon to a device that doesn’t have any particular image already attached
defaultIcon ()
{
        return 'plugins/device.awesome/data/img/icons/awesome.png';
}
registerForUpdade: registers to receive updates for a device
registerForUpdate (device, fn)
{
        deviceEvents.on ('update:'+device.id, fn);
        return () => deviceEvents.removeListener ('update:'+device.id, fn);
}
getConnections: returns the connections array for every unique device id
getConnections ()
{
        let connections = [];
        for (let deviceId in connections)
        {
                connections.push (connections[deviceId].device);
        }
        return connections;
}
connect: connects the device to Wyliodrin Studio; if there is no connection previously created for the current unique id of the device, you should create a data transport path conforming with the type of your device;
connect(device, options)
{
        /* Here goes the actual code that you will write in order to connect the device. */

        setTimeout(() => {
                device.status = 'CONNECTED';
        }, 1000);
}
after that, according to the current status, you will bring up to date your device, using the updateDevices function and you will set up its functioning characteristics.
The device statuses are:
| DISCONNECTED | the device is offline |
| CONNECTING | trying to connect |
| SYNCHRONIZING | trying to synchronize with the device |
| CONNECTED | the device is online |
| ISSUE | there is some issue, the system is partially functional |
| ERROR | there is an error with the system |
disconnect: opens a dialog where the user chooses the way he wants to disconnect the device; the methods of disconnection are:
- StandBy -
- Disconnect -
- Turn-Off -
disconnect(device, options)
{
        /* Here goes the actual code that you will write in order to connect the device. */
        setTimeout(() => {
                device.status = 'DISCONNECTED';
        }, 1000);
}
After creating the new device object, you have to register it using the workspace function registerDeviceDriver.
workspace = studio.workspace.registerDeviceDriver('awesome', device_awesome);
Here you can also generate the specific buttons for your type of device, using also an workspace function: registerDeviceToolButton.
For the awesome device we create a Run button, that will run the code written by the user in the current project.
workspace.registerDeviceToolButton('DEVICE_AWESOME_RUN', 10 async () => {
        let device = studio.workspace.getDevice ();

        /* Here goes the actual code that will make your device run a project */
        console.log('Run');
        }, 'plugins/device.awesome/data/img/icons/run-icon.svg',

        /* The aditional options that make the Run Button visible and enabled only if there is a connected device
        and its type is "awesome" */
        {
                visible () {
                        let device = studio.workspace.getDevice ();
                        return (device.status === 'CONNECTED' && device.connection === 'awesome');
                },
                enabled () {
                        let device = studio.workspace.getDevice ();
                        return (device.status === 'CONNECTED' && device.connection === 'awesome');
                },
                type: 'run'
        });
Also, if your device interacts with the console or the mqtt server, you will have to create some specific functions that will establish the data transfer protocol.
At the end of the setup function, we register the device_awesome object:
register(null, {
        device_awesome
});
If you want to test this plugin, you will have to search for “device.awesome” in the docs/examples folder and copy it inside the source/plugins folder, then rebuild the application to make the new plugin available.
How to add a wyapp board
If you’re trying to add a new board plugin, our “device.wyapp.raspberrypi”, “device.wyapp.beagleboneblack” and “device.wyapp.udooneo” plugins may serve as a support for you.
In the index.js file, inside the setup function, you need to create an event, so when the board is ‘ready’, you call the registerPinLayout function from our “pinlayout” plugin. The purpose of this function is to register the pins of your board in the Pin Layout tab, using the appropriate images that you saved in the data folder of our plugin.
For example, if we are connected to a Raspberry Pi, the content of the Pin Layout tab will be:
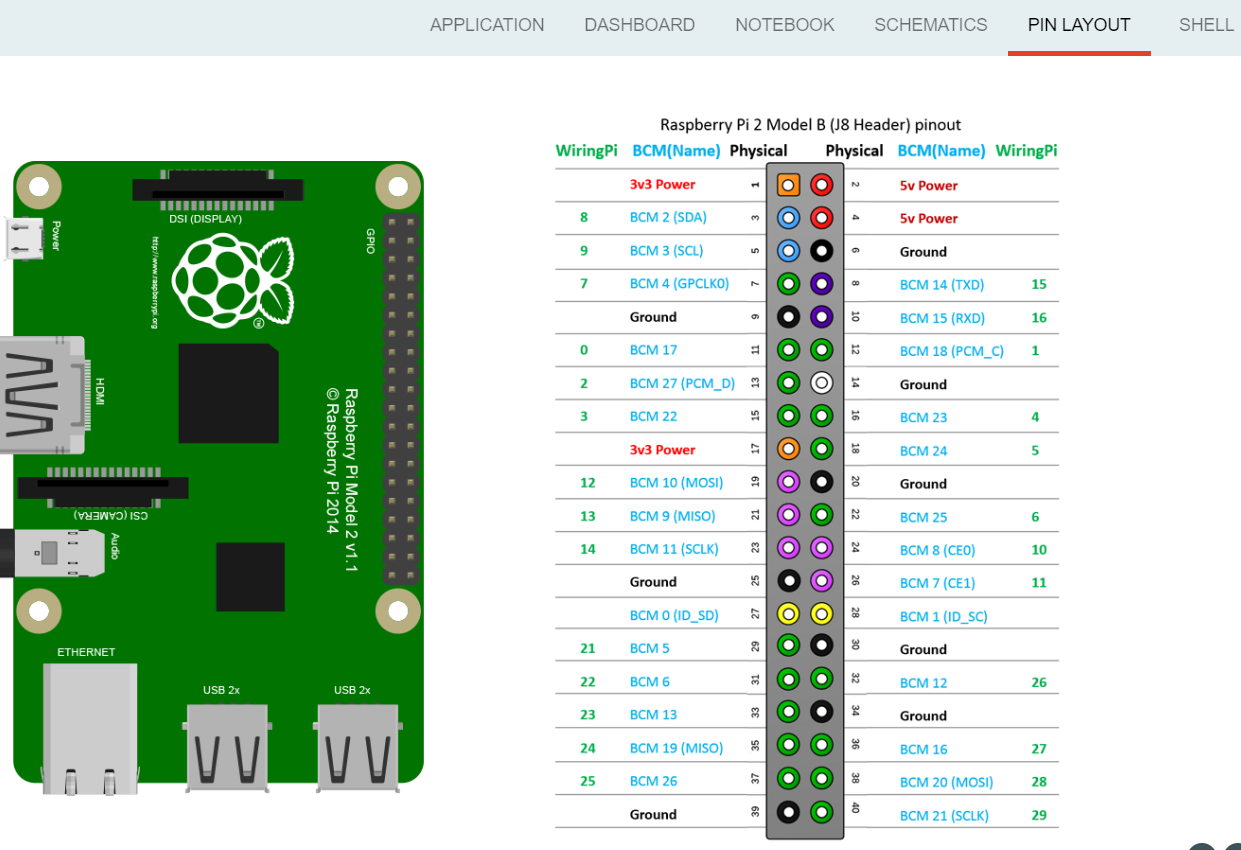
The next step is to create an object having your new board name, with the next functions:
iconURL() => the image corresponding to your board
found(device) => if a device was found, you can modify some of its properties
update(device) => update a device, modify some of its properties
run(project) => modify the project before run
The final step is to register your board and, if it’s necessary, the blocks that you’ll use, from the “editor_visual” plugin.
For example, if you want to register a raspberry pi board, you should use this function:
registerBoard ('raspberrypi', raspberrypi);
How to write an editor plugin
The purpose of an editor plugin is to create a code editor, correlated to our “projects” plugin. The editor will allow the user to open different type of files created or imported within the tree structure of a project.
If you are creating an editor plugin, we recommend you to name the folder “projects.editor.”, followed by the name of your editor.
For example, in this tutorial we will create an awesome editor, that will display the content of the files having the .aws extension.
The first step is to create the package.json file, which will have the classic structure:
{
    "name": "projects.editor.awesome",
    "version": "0.0.1",
    "main": "index.js",
    "private": true,
    "plugin": {
        "consumes": ["workspace","projects"],
        "provides": [],
        "target": ["electron", "browser"]
    }
}
In this example, the editor will use functions only from the “workspace” and “projects” plugins, but you are free to “consume” any other plugin required by your editor.
After that, wi will add the views folder, where you will design the Vue components for your editor, in this example AwesomeEditor.vue. In the template section, you will actually add the tags required by the code editor, while in the script part you will handle the functions that your editor will perform in order to display the content of the supported files.
<template>
        <!-- Here goes the design of your editor -->
</template>
/* <script> */

import path from 'path';

export default {
        name: 'AwesomeEditor',

        /* We pass the 'project' (path to the current project) and 'filename' (name of the opened file, including extension)
          in order to read the content of the file and handle it depending on the type of extension
        */
        props: ['project', 'filename'],
        data() {
                return {
                        /* All the variables you will use in the template section */
                }
        },
        methods: {
                /* Code of all the function you will use in the template section */
        },
        watch:
        {
                filename:
                {
                        immediate: true,
                        async handler()
                        {
                                /* Full path to the current file */
                                let filePath = path.join(this.project.folder, this.filename);

                                /*Extension of the current file */
                                let extension = this.filename.substring(this.filename.lastIndexOf('.')).substring(1);

                                /* Get the content of the current file */

                                let content = await this.studio.filesystem.readFile(filePath);

                                /* Here goes the code for your file editor */

                        }
                }
        }

}
/* </script> */
The final step is to create the index.js file, where you will register your editor. The structure of this file should look like this:
import AwesomeEditor from './views/AwesomeEditor.vue';

export default function setup (options, imports, register)
{
        const studio = imports;
        studio.projects.registerEditor('EDITOR_AWESOME',['aws'], AwesomeEditor);

        register (null, {});
}
The AwesomeEditor is registered using the registerEditor function:
-
registerEditor(name, languages, component, options)¶ This function registers a new type of editor.
The editor has a name, which is a translatable string that will be dispayed as the title of the editor, languages, which represent the array with all the supported programming languages id’s or file extensions, and a Vue component, representing the actual content and design of the editor tab.
Arguments: - name (string) – the name/id of the editor
- languages (Array.<string>) – the editor languages
- component (Vue) – the component to display
- options (array) – the editor options
Returns: boolean – - true if successful, false otherwise
Examples:
registerEditor('EDITOR_ACE',['py','js'], Ace);
How to write a language plugin
The purpose of this type of plugins is to register a new programming language that will be supported by the Wyliodrin Studio IDE.
For example, we’ll try to add a new programming language, called “MyAwesomeLanguage”, with the “.aws” extension:
As you can notice, the name of this type of plugins should begin with “language.”, which will be followed by the actual name of the programming language that you want to register, which means that you will have to create a new folder, “language.awesome”.
As any other plugin, it’s required to have a package.json file, having the classic format. It’s necessary to mention that this type of plugin consumes both “workspace” and “projects” plugins, and their target are both “electron” and “browser”.
So, the content of your package.json should look like that:
{
        "name": "language.awesome",
    "version": "0.0.1",
    "main": "index.js",
    "private": true,
    "plugin": {
        "consumes": ["workspace","projects"],
        "provides": [],
        "target": ["electron", "browser"]
    }
}
The language plugin doesn’t have any Vue component, so we don’t have to create the views folder, but we need the data folder to save a characteristic image for the programming language. Let’s pick as example for our language.awesome plugin, an icon that we will save in the data/img folder:

Inside the main file, index.js, we obviously need to initialize the studio variable to null, and inside the setup function it will receive all the imported functions from the “workspace” and “projects” plugin.
The next step is to create the awesome object, containing the options of our programming language:
let studio = null;

export default function setup (options, imports, register)
{
        studio = imports;

        let awesome = {

                /* Create the main file of each project, "main.aws" */
                async createProject(name){
                        await studio.projects.newFile(name,'/main.aws','print ("Hello from Awesome")');
                },

                /* Return the name of the default file */
                getDefaultFileName() {
                        return '/main.aws';
                },

                /* Return the name of the default run file */
                getDefaultRunFileName() {
                        return '/main.aws';
                },

                /* Return the content of the makefile */
                getMakefile(project, filename) {
                        if (filename[0] === '/')
                                filename = filename.substring (1);

                        return 'run:\n\tawesome main.aws';
                },
        };
}
The next step is to register the new programming language, using the function registerLanguage:
studio.projects.registerLanguage('awesome', 'awesome', 'plugins/language.awesome/data/img/project.png', 'plugins/language.awesome/data/img/awesome.png', awesome);
where the last parameter represents the awesome object we created before.
If you want to test this plugin, you will have to search for “language.awesome” in the docs/examples folder and copy it inside the source/plugins folder, then rebuild the application to make the new plugin available.
How to add a language addon plugin
This type of plugin modifies the language plugin for certain devices. For instant, we are using it for visual and rpk. To design your own language addon, you will have to create a new plugin folder, called “language.visual.”, followed by the type of the device you want the language addon for.
For example, let’s say that you want to create an addon for your Awesome device and you need to create a new plugin, called language.visual.awesome
The first step is to create a new folder, visual, where you will add ……………… .js files.
You will also have to create a toolbox.xml file, where you will include the actual design of the blocks you want to be available for your device.
The index.js file will first import the xml module and the toolbox.xml file, the second one as a string, using the raw-loader module. More details about this webpack loader can be found here.
import xml from 'xml-js';
import toolboxStr from 'raw-loader!./visual/toolbox.xml';
Then, you will import the code and the blocks from the .js files included in the visual folder.
let blocks = require ('./visual/definitions_for_awesome.js');
let code = require ('./visual/code_for_awesome.js');
The setup function will register the changes you made for your device, using the projects function registerLanguageAddon.
let studio = null;
export function setup (options, imports, register)
{
        studio = imports;

        studio.projects.registerLanguageAddon ('visual', 'awesome', 'awesome', {
                getDefaultRunFileName ()
                {
                        return '/main.visual.js';
                },

                sourceLanguage ()
                {
                        return 'awesomelanguage';
                }
        });

        let toolbox = xml.xml2js (toolboxStr);
        studio.editor_visual.registerBlocksDefinitions ('awesome', blocks, code, toolbox, {type: 'awesome', board: 'awesome'});

        register (null, {});
}
As you can notice, the final step is to parse the toolbox string imported before and then to register the blocks using the registerBlocksDefinitions function from the projects.editor.visual plugin.
The parameters of this function are:
| Property title | Description | Required / Optional | Default value |
| id | the id of the device | required | - |
| blocks | the blockly visual blocks | required | - |
| code | the blockly code | required | - |
| toolbox | the parsed toolbox string | required | - |
| options | additional options, an object where you can specify the device type and the board | optional | {} |
Of course, you also need to have a package.json file, where you should mention that your language addon plugin also consumes “editor_visual”, because it’s using the registerBlockDefinitions function.
{
    "name": "language.visual.awesome",
    "version": "0.0.1",
    "main": "index.js",
    "private": true,
    "plugin": {
        "consumes": ["workspace","projects","editor_visual"],
        "provides": [],
        "target": ["electron"]
    }
}
If you want to test this plugin, you will have to search for “language.visual.awesome” in the docs/examples folder and copy it inside the source/plugins folder, then rebuild the application to make the new plugin available.