General Architecture of Wyliodrin STUDIO
Wyliodrin STUDIO consists of a series of plugins that we used to build the different parts of our application.
Basically, a plugin is a component of the program that will help you apply different features. Due to the fact that Wyliodrin Studio supports plugins, it enables customization, which means that you will be able contribute to the development and improvement of our application.
To design the user interface we chose the Vue framework and for data synchronization we used VueX library, which is deeply integrated into Vue and exploits its reactivity.
Plugin architecture
Each plugin is a folder in the source/plugins.
In order to create your own plugin, you should open the folder that you cloned before with a source-code editor, like Visual Studio Code. After that, you will have to open the plugins folder, that represents the “storage center” for all the plugins and that is found inside the source folder. Here, in plugins, you will create a new folder, named after the plugin you’d like to add.
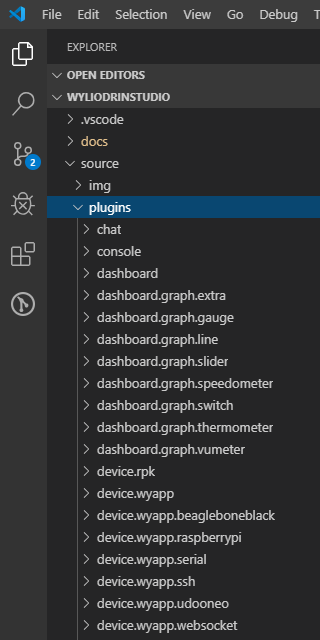
We recommand for the plugin name to be lowercase, and the words separated by “.” For example, we’ll create the my.new.plugin folder.
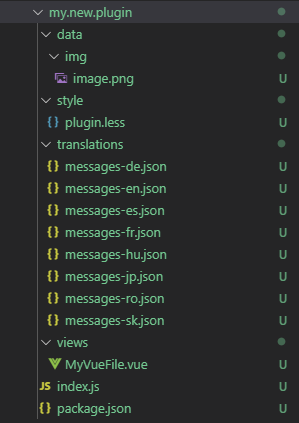
The main components that you’ll need to create for your plugin are:
- The data folder: contains a sub-directory, img, which can also include different folders that you’ll need in order to keep the images that you use inside your .vue files.
- The style folder: contains the .less files, where we apply the CSS design for the different vue-components.
- The translations folder: consists of the messages-ln.json files(ln=language abbreviation). More details regarding this subject can be found here.
- The views folder, optional, recommended only if you will create .vue files to design the user interface for your plugin. (For example, it can contain the file MyVueFile.vue)
- The package.json file, which contains an object with the primary details regarding your plugin:
| Property title | Description | Required / Optional | Default value |
| name | the name of the plugin (“button.example”) | required | - |
| version | 0.0.1 | required | “0.0.1” |
| main | the main file of the plugin, that will be “index.js” | required | “index.js” |
| plugin | an object where we specify the characteristics of the plugin | required | - |
The properties of the “plugin” component are:
| Property title | Description | Required / Optional | Default value |
| consumes | we specify from which other plugins our plugin uses exported functions (required “workspace”) | required | [“workspace”] |
| provides | we specify if our plugin functions will be exported (“example_button”) | optional | [] |
| target | for which version of the program the plugin should be working: browser or electron | required | - |
As an example, a package.json file should look like this:
{
        "name": "my.new.plugin",
        "version": "0.0.1",
        "main": "index.js",
        "private": false,
        "plugin": {
                "consumes": ["workspace"],
                "provides": ["my_new_plugin"],
                "target": ["browser", "electron"]
        }
}
- The index.js file, which will be your main file.
Here, you can import all the .vue files that you need to register.
For example, if you previously create some Vue components to design the user interface, the first line in your index.js could look like that:
import MyVueFile from './views/MyVueFile.vue';
After that, you’ll need to instantiate an object that can be empty, or that can contain different functions that you’ll use.
The most important component of this file is the setup function that has to be exported, its purpose being to register your plugin and to make it functional inside the application.
export function setup(options, imports, register)
{
        /* Collect the functions exported by the consumed plugins */
        studio = imports;

        /* Here goes your code */

        register(null, {});

}
At the end, the folder should look like this:
Dependencies
We are using the webpack module to process the Wyliodrin STUDIO application. If you’re not familiarized with webpack, you should consult the theory presented in their documentation, in order to understand which are the core concepts and how the modules that we use are mapped into the “dependency graph”.
As you probably read before, there are 2 different options to build the code, depending on the version that you are using:
- Standalone
npx webpack
- Browser
npx webpack --config=webpack.browser.config.js
Once the code was built, a folder named “build” is created. Its content represents the distribution code, which means a “minimized and optimized output of our build process that will eventually be loaded”. More details can also be found here.
To pack (or “bundle”) a dependency, we need to install the module locally. These dependencies are copied in the build folder, but they are not available yet for the browser version of Wyliodrin STUDIO.
npm install archiver --save
We also created the devDependencies option, which allow to some particular dependencies to work not only for the electron edition, but also for the browser one. They are saved in the main package.json file of the program, as devDependencies property, and they are installed using the command:
npm install highcharts --save-dev
Imports
Each plugin exports in its main file “index.js” a setup function, designed to register the plugin. The structure of this function is:
export function setup(options, imports, register)
{
        /* the function code */
}
As you can see, one of the parameters of this function is imports.
The imports object has as purpose to collect all the functions and dependencies from the other plugins that our plugin consumes.
For example, let’s suppose that you have a plugin called “test.plugin”, which depends on the “workspace” and “projects” plugins. This means that the content of its package.json file will be:
{
    "name": "test.plugin",
    "version": "0.0.1",
    "main": "index.js",
    "private": false,
    "plugin": {
        "consumes": ["workspace", "projects"],
        "provides": [],
        "target": ["electron", "browser"]
    }
}
The fact that your plugin consumes these 2 plugins means that the imports object will include all their modules and will allow you to access all their functions. Therefore, your setup function from the “index.js” file could look like this:
let studio = null;

export function setup (options, imports, register)
{
        studio = imports;

        /* use the registerTab function from the workspace plugin */
        studio.workspace.registerTab('TEST_TAB', 100, TestTab, {
                visible ()
                {
                        /* use the getCurrentProject function from the projects plugin to make
                        the tab visible only if there is a project opened */

                        return !!studio.projects.getCurrentProject();
                }
        });
}
Provides
As it was specified in this section, “provides” is a property assigned to the “plugin” property in the package.json file of each plugin. The idea around this property is to indicate if a plugin will export its own functions and modules to be used by other plugins.
For example, let’s assume that you have the same plugin, “test.plugin”, which doesn’t provide anything. This means that all its functions will be private and no other plugin will pe able to use them, not even if it specifies that it “consumes” your plugin.
In this case, the package.json file of your plugin will look like this:
{
    "name": "test.plugin",
    "version": "0.0.1",
    "main": "index.js",
    "private": true,
    "plugin": {
        "consumes": [],
        "provides": [],
        "target": ["electron", "browser"]
    }
}
And the index.js file will look like this:
export function setup (options, imports, register)
{
        studio = imports;

        /*Here goes your code*/
        register (null, {});
}
But if you want for your plugin to provide all its functions so that the others plugins may access and use them, you have to indicate this option inside the “provides” property. You should be careful at the fact that the provided object should not contain and “.” in its name, unlike the plugin name.
Therefore, the content of the package.json should be:
{
    "name": "test.plugin",
    "version": "0.0.1",
    "main": "index.js",
    "private": true,
    "plugin": {
        "consumes": [],
        "provides": ["test_plugin"],
        "target": ["electron", "browser"]
    }
}
As you can see, your “test.plugin” provides the “test_plugin” object, which means that if another plugin it’s using its functions, it should consume the same “test_plugin” object.
In this situation, the index.js file will have the following structure:
export function setup (options, imports, register)
{
        studio = imports;

        /* Here goes your code*/

        register (null, {
                test_plugin: test_plugin
        });
}
Architecture Components
Toolbar Buttons
The toolbar is a component located at the top of the window, on which you can add multiple elements.

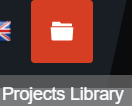
The toolbar buttons are created using the registerToolbarButton function. One of the functionalities added in the toolbar using this function is the Projects Library, which opens a dialog where the user can manage his applications.
You can learn more about this component here.
Tabs

The tabs are the main components of the workspace, created using the registerTab function. They offer the possibility to write and test the code for programming an IoT device, display sensors data, import Frietzing schematics or access the connected device directly through the shell.
The existing tabs at the moment are: Application, Dashboard, Notebook, Schematics, Pin Layout and Shell.
You can find more details about the tabs in this section.
Menu
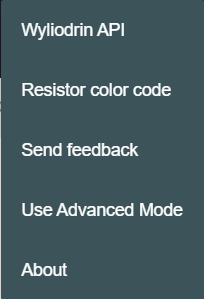
The Menu is an element created on the toolbar component, represented by the following icon:

When clicked, it opens a menu containing different elements that help the user learn more about Wyliodrin STUDIO, send his feedback or switch to the advanced mode.
The components of the menu are:
A better presentation of the menu component and the menu items can be found in this section.
Connection Button
In the workspace plugin we added the connection button, which was designed inside the DeviceTools.vue component. It is visible only when there is no device connected to Wyliodrin Studio.

On click, it calls the showConnectionSelectionDialog and it opens a dialog where the user can see all the available devices. By clicking on a device, he will be asked to input the technical specifications and the login credentials, in order to connect and enable the device functionalities. When the connection was successfully completed, the device status will change from DISCONNECTED to CONNECTED.
DeviceTool Buttons
These buttons are visible only when a device is connected, because they will replace the Connection Button, and they can be different according to the device type.
We added them in the DeviceTools.vue component, and this is how they look like:

A better description of this component can be found here.
Status Buttons

The Status Buttons are created with the registerStatusButton function. They are used to open the console or the mqtt server.
The Console button opens a console similar to the shell.
The MQTT button opens an interface where you can choose the port where the MQTT server will be opened (publish-subscribe-based messaging protocol).
You can learn more about the status buttons here.