Wyliodrin Studio API
Workspace plugin API
“Workspace” is the main plugin in our application. It exports the “workspace” object, containing a series of functions that we use in every other plugin.
Data Types
-
class
Device()¶ Device Identification
Arguments: - id (String) – unique id for the device (determined by the driver)
- name (String) – name of the device
- type (String) – type of the device (the device type id that reported the device)
-
disposable()¶ a function that is called when the item may be deleted
Tabs
-
registerTab(name, priority, component, options)¶ This function will register a new tab in the workspace.
Each tab has a title, that will be displayed in the workspace, a priority, which refers to the position of a tab in the list of tabs, a component, representing the actual content and funtionality of the tab, and aditional options, that will authorize or will block the user access, depending on their value.
The default value of these options is () => return true, which means the menu item will be visible and will allow user access, but it can be customized at the moment of the registration of one element.
If the value of enabled will be changed to another function, the name of the menu item will still be visible in the list of all menu items, but it won’t permit any user action, because the item will not become usable until the return value of the function will be true.
If the value of the visible option is changed to another function, the name of the menu item will not appear in the list with all menu items until the return value of the function will become true; in this case, when the element is visible, it becomes automatically enabled.
Arguments: - name (string) – the translation ID of the title of the tab
- priority (number) – the priority of the tab, lower is to the left
- component (Vue) – the Vue component to display
- options (options) – additional options, like visible or enabled; the tab is available for user interaction according to the value of these options;
Returns: disposable – an item that may be disposed {
disposable()}Examples:
let time = new Date();

registerTab('PROJECT_NOTEBOOK', 300, Notebook, {
          enabled () {
                  return time.getHours() > 8;
          }
});
In this example, the Notebook tab will be enabled and will allow user access only after 8AM. Until then, it will appear in the list of tabs as it follows:

-
registerMenuItem(name, priority, action, options)¶ This function will register a new item in the menu that is displayed in the top left corner of the window. A menu item is a component that will allow the “analysis” of Wyliodrin STUDIO, the purpose of the menu being to include details about the application and its operation.
Each item has a name, that will be displayed in the menu, a priority, which refers to the position of an element in the list of menu items, an action, representing the content that will be opened when the item is selected, and aditional options, that will authorize or will block the user access, depending on their value.
The default value of these options is () => return true, which means the menu item will be visible and will allow user access, but it can be customized at the moment of the registration of one element.
If the value of enabled will be changed to another function, the name of the menu item will still be visible in the list of all menu items, but it won’t permit any user action, because the item will not become usable until the return value of the function will be true.
If the value of the visible option is changed to another function, the name of the menu item will not appear in the list with all menu items until the return value of the function will become true; in this case, when the element is visible, it becomes automatically enabled.
Arguments: - name (string) – the name/id of the menu item
- priority (number) – the priority of the tab, lower is to the left
- action (function) – the function to run when clicked
- options (Object) – additional options, like visible or enabled; the tab is available for user interaction according to the value of these options
Returns: disposable – - an item that may be disposed
Examples:
registerMenuItem('WYLIODRIN_API', 10, () => documentation.openDocumentation());
In this example, the Wyliodrin API menu element will open a new documentation window when clicked.
-
renameMenuItem(prevName, actualName)¶ Rename an item from the menu.
The previous parameters that were set for the current menu item will remain unchanged, but the name of the element will be updated in the list of menu items.
Arguments: - prevName (string) – the initial name of the item
- actualName (string) – the actual name of the item
Returns: disposable – - an item that may be disposed
Examples:
renameMenuItem('WYLIODRIN_API', 'WYLIODRIN_STUDIO_API');
-
registerDeviceToolButton(deviceType, name, priority, action, iconURL, options)¶ This function is used to register a new device tool button, specific for every device type.
For example, when a Raspberry Pi board is connected, the following buttons become available: Run, Stop, TaskManager, PackageManager, NetworkManager.
Each device button require a deviceType, to know for which type of device we are registering the customized button, it has a translatable name, that will be displayed under it on mouse hover, a priority, which refers to the position of an element in the device buttons list, an action, representing the content that will be opened when the button is selected, an icon that will be the actual symbol of the button and on which the user will be able to click, and aditional options, that will authorize or will block the user access, depending on their value.
The default value of these options is () => return true, which means the device button will be visible and will allow user access, but it can be customized at the moment of the registration of one element.
If the value of enabled will be changed to another function, the name of the device button will still be visible in the list of all device buttons, but it won’t permit any user action, because the button will not become usable until the return value of the function will be true.
If the value of the visible option is changed to another function, the name of the device button will not appear in the list with all device buttons until the return value of the function will become true; in this case, when the element is visible, it becomes automatically enabled.
Arguments: - deviceType (string) – the device driver type the button is for
- name (string) – the name/id of the menu item
- priority (number) – the priority of the tab, lower is to the left
- action (function) – the function to run when clicked
- iconURL (string) – the relative path to the image assigned
- options (Object) – additional options, like visible or enabled; the button is available for user interaction according to the value of these options
Returns: disposable – - an item that may be disposed
Examples:
let time = new Date();

registerDeviceToolBotton('RUN', 10,  => showNotification('You clicked the Run button!'),
          'plugins/studio/workspace/data/img/icons/button.svg', {
          visible() {
                  return time.getHours() > 8;
          }
});
This example creates a characteristic device button called ‘Run’, that will display a notification when clicked. Because of the visible option, the button will appear in the list of all tool buttons only after 8AM.
Status Bar
-
registerStatusButton(name, priority, component, iconURL, options)¶ This function will register a new button in the status bar that is displayed in the bottom of the window.
Each status button has a translatable name, that will be displayed under it on mouse hover, a priority, which refers to the position of an element in the status buttons list, a component, representing the content that will be shown when the button is clicked, an icon that will represent the actual symbol of the button and on which the user will be able to click, and aditional options, that will authorize or will block the user access, depending on their value.
The default value of these options is () => return true, which means the status button will be visible and will allow user access, but it can be customized at the moment of the registration of one element.
If the value of enabled will be changed to another function, the name of the status button will still be visible in the list of all status buttons, but it won’t permit any user action, because the button will not become usable until the return value of the function will be true.
If the value of the visible option is changed to another function, the name of the status button will not appear in the list with all status buttons until the return value of the function will become true; in this case, when the element is visible, it becomes automatically enabled.
The statusButtons registered at the moment can open the Console and the Mqtt server interface.
Arguments: - name (string) – the name/id of the menu item
- priority (number) – the priority of the tab, lower is to the left
- component (Vue) – the Vue component to display
- iconURL (string) – the relative path to the image assigned
- options (Object) – additional options, like visible or enabled; the button is available for user interaction according to the value of these options
Returns: disposable – - an item that may be disposed
Examples:
registerStatusButton('CONSOLE', 1, Console, 'plugins/studio/console/data/img/icons/terminal-icon.svg');
In this example, a new status button is created. The Console component has to be previously created as a Vue component and imported in the index.js file where the new status button is registered:
import Console from './views/Console.vue';
-
openStatusButton(name)¶ Open a status button, using the dispatchToStore function to send to the activeStatusButton variable from the workspace store the value of the chosen status button.
Arguments: - name (string) – the name of the status button to open
Examples:
openStatusButton('CONSOLE');
-
closeStatusButton()¶ Close a status button, using the dispatchToStore function to send to the activeStatusButton variable from the workspace store an empty string, which means that the currently open status button is no longer available.
Examples:
closeStatusButton();
Data Store
-
registerStore(namespace, store)¶ This function registers a new namespaced store.
A “store” is basically a container that holds the application state. Since a Vuex store is reactive, when a Vue component needs or changes a variable state, it will reactively and efficiently update the values.
Arguments: - namespace (string) – the name/id of the menu item
- store (Object) – the actual store object, imported from the ‘store.js’ file of the plugin
Returns: undefined –
Examples:
registerStore('projects', projectStore);
-
getFromStore(namespace, variable)¶ Gets the value of a variable from a selected store.
Arguments: - namespace (string) – the name of the store where the variable is registered
- variable (string) – the name of the variable to process
Examples:
let project = getFromStore('projects', 'currentProject');
-
dispatchToStore(namespace, action, data)¶ Sends data to a selected store promptly and updates the state and value of a certain variable.
Arguments: - namespace (string) – the name of the store where the data will be dispatched
- action (string) – the variable to be updated
- data (Object) – additional data to send to the variable
Examples:
dispatchToStore('projects', 'currentProject', null);
Vue
-
registerComponent(component)¶ Register a Vue component.
Arguments: - component (Vue) – the Vue component to be registered
Examples:
registerComponent(MyComponent);
-
setWorkspaceTitle()¶ This function sets the title of the workspace according to the name of the current project.
The workspace title will be displayed to the left of the tabs list.
Examples:
setWorkspaceTitle (project.name);
Device Drivers
-
registerDeviceDriver(name, deviceDriver)¶ This function registers a new device type. It requires a name that indicates the type of the device for which it will register the driver, and the actual device driver object, that include a series of properties and functions.
Arguments: - name (string) – device type name
- deviceDriver (DeviceDriver) – actual device driver, consists of a series of functions necessary to represent, connect, disconnect or set up a device.
Examples:
registerDeviceDriver('my_device', deviceDriver);
-
updateDevices(type, dev)¶ This function updates the list of devices for a device type. It’s required to know the type of the device that will be updated, and the list wilth all the devices that will be attached to the selected type of device.
Arguments: - type (string) – device type, has to be registered
- dev (Array.<Device>) – a list of devices (
Device())
Examples:
updateDevices (myDevices);
-
connect(device, options)¶ The purpose of this function is to connect Wyliodrin STUDIO to a device.
In order to connect, it’s required to have a valid device object and the corresponding connection options. This process demands to constantly check the device status.
The statuses that a device can have are:
DISCONNECTED - this is offline
CONNECTING - trying to connect
SYNCHRONIZING - trying to synchronize with the device
CONNECTED - this is online
ISSUE - there is some issue, the system is partially functional
ERROR - there is an error with the system
Arguments:
-
getDevice()¶ Returns a device from the store.
This function has no parameters and it’s using the getFromStore function, which returns a device object, with all its properties. It’s useful to work with it each time you want to manipulate the currently connected device and you need to know its type.
Examples:
let device = getDevice ();
-
getStatus()¶ This function returns the status of a device.
The function has no parameters and calls the getFromStore function, which returns from the workspace store a string representing the current status of the device the user tries to work with.
Examples:
let status = getStatus();
-
disconnect()¶ This function disconnects the currently connected device from Wyliodrin STUDIO, which means that it deletes the connections and characteristics of this device, as reported by the type of disconnection that the user chooses:
StandBy -
Disconnect -
Turn Off -
-
showConnectionSelectionDialog()¶ This function opens a customized dialog box, used to select a device that will be connected to Wyliodrin Studio.
It’s called when the user clicks on the ‘Connect’ button and it shows a dialog containing a list with all the devices available for connection.
Projects plugin API
The “projects” plugin is the second most important component in our application. Same as “workspace”, it has its own store, where we register the applications the user creates, in order to manage properly his activity.
Data Types
-
class
Project()¶ Project Identification
Arguments: - date (string) – date and time of the last time the project was accsesed
- folder (string) – absolute path to the project
- language (string) – programming language of the project
- name (string) – the actual name of the project
-
class
Language()¶ Programming Language Identification
Arguments: - addons (object) – the specific features of the language // language addons
- icon (string) – path to the language image
- id (string) – language name
- fileIcons (array) – array of language specific fileIcons
- options (Object) – language functions
-
class
file()¶ File Identification
Arguments: - file (string) – extension if it’s a file
- children (Array.<file>) – children if it’s a folder
- path (string) – path to object
- name (string) – name of object
-
disposable()¶ a function that is called when the item may be deleted
Programming Languages
-
projects.getLanguage(languageID)¶ This function returns a programming language object with the following properties: id, title, icons, addons and options.
It requires the unique id that identifies the language in the list of all programming languages.
Arguments: - languageID (string) – the id of said language
Returns: Language – - programming language properties
-
registerLanguage(id, title, projectIcon, logoIcon, fileTreeIcon, fileIcons, options)¶ This function registers a language object by updating the list of all languages with a new programming language having its own specifications and functions.
Every new language has an id, its unique identifier, a title, which is the actual name of the programming language, a characteristic icon, and its own options required in order to be working properly.
The accepted languages are: javascript, python, bash and visual.
Arguments: - id (string) – language id
- title (string) – language title
- projectIcon (string) – icon that appears in the projects library
- logoIcon (string) – icon that appears in the new application popup
- fileTreeIcon (string) – icon that appears at the top of the file tree
- fileIcons (string) – icons for files
- options (Object) – language options
Examples:
registerLanguage('python', 'Python', 'plugins/languages/python/data/img/project_python.png', 'plugins/languages/python/data/img/python.png', python);
In this example, the las parameter, python is an object previously created, its properties being the characteristic functions for this programming language.
-
registerLanguageAddon(language, types, boards, options)¶ This function is used to add an addon to an already existing language. In this case, an addon refers to a specific feature that can be set for a board.
Each addon requires the programming language unique id, the type of the board for which the feature will be set, the type of the actual addon, and the additional functioning options of the feature.
Arguments: - language (Object) – language id
- types (string|Array.<string>) – addon type
- boards (string|Array.<string>) – addon board
- options (Object) – addon options
Returns: boolean – - true if successful, false otherwise
-
registerEditor(name, languages, component, options)¶ This function registers a new type of editor.
The editor has a name, which is a translatable string that will be dispayed as the title of the editor, languages, which represent the array with all the supported programming languages id’s or file extensions, and a Vue component, representing the actual content and design of the editor tab.
Arguments: - name (string) – the name/id of the editor
- languages (Array.<string>) – the editor languages
- component (Vue) – the component to display
- options (array) – the editor options
Returns: boolean – - true if successful, false otherwise
Examples:
registerEditor('EDITOR_ACE',['py','js'], Ace);
This is an example of how you can register an Ace editor that will accept python(py) and javascript(js) programming languages. The Ace component will be designed as a Vue component for the editor and imported inside the main file where the new editor is registered.
-
languageSpecificOption(project, option)¶ This function returns a specific option that was set to a programming language.
In order to obtain it, is required to have the project for which the option was set and the actual name of the specific option.
Arguments: - project (Project) – project object
- option (string) – option
Returns: Object – the specific option of the programming language
Examples:
let sourceLanguage = languageSpecificOption (project, {...});
Projects
-
createEmptyProject(name, language)¶ This function creates a new empty project.
Each project requires a name, that will be entered by the user as a text in the input area, and a programming language that the project will use, also chosen by the user.
Arguments: - name (string) – Project name
- language (string) – Project language
Returns: Project – - Project object
Examples:
project = createEmptyProject('MyProject', 'py')
-
deleteProject(project)¶ This function deletes all the files related to the project chosen by the user, when he clicks on the “Delete” button.
After removing all the files, the currentProject and currentFile are dispatched to the projects store as null.
Arguments: - project (Project) – Project object
Returns: boolean – true if succsesful, false otherwise
Examples:
deleteProject('MyProject');
-
renameProject(project, newName)¶ This function renames a selected project, when the user clicks on the Rename button.
It’s required to know the project that will be renamed and the new name, that will be entered by the user in the input text area.
Arguments: - project (Project) – Project object
- newName (string) – New project name
Returns: boolean – true if succsesful, false otherwise
Examples:
renameProject('MyProject', 'MyRenamedProject');
-
cloneProject(project, newName)¶ This function is used to clone a project, by creating a duplicate of the selected project and assigning to it the “newName” value, chosen by the user.
Arguments: - project (Project) – Project object
- newName (string) – Cloned project name
Returns: boolean – true if succsesful, false otherwise
Examples:
cloneProject(project, 'MyClonedProject');
-
importProject(project, data, extension)¶ This function imports a project archive.
Loads a new project tree from the user’s computer. The archive extension can be “.zip”, “.tar” (in this case the files will be extracted), or ‘.wylioapp” (we are creating recursively the project folder).
Arguments: Returns: boolean – true if succsesful, false otherwise
Examples:
importProject(project, projectData, '.zip');
-
recursiveCreating(necesarry)¶ Recursively generate the project tree structure with paths and names
necesarry.item - file item
necessary.item.isdir - is or not directory
necessary.item.children - only if it’s a directory
necessary.item.name - name
necessary.item.content - file content only if it’s a file
Arguments: - necesarry (Object) – Object representing the details about every file withing the project
Returns: boolean – true if succsesful, false otherwise
-
exportProject(project)¶ This function exports a project archive.
It’s required to know the project that the user will export, including all of its files and folders, and the path to where the project will be saved in the user’s computer. The archive will have the .zip extension.
Arguments: - project (Project) – project object
Examples:
exportProject(project);
-
recursiveGeneration(project, file)¶ Recursively generate a deep object with all the contents of a project
Arguments: Returns: file – the root of the folder with all its contents
-
loadProjects()¶ Load existing projects.
This function has no parameters. It creates a list with all the existing projects when it’s called, by reading all the folders from the main path, workspacePath.
Returns: Array.<Project> – - a list of projects Examples:
let projects = loadProjects();
-
selectCurrentProject(project)¶ This function selects a project from the list with all the projects, when the users clicks on it, and it displays the content of the project in the Application tab.
Arguments: - project (Project) – project object
Returns: boolean – true if succsesful, false otherwise
-
loadPreviousSelectedCurrentProject()¶ Load a previous selected project. The function has no params, loads the project from local files.
Examples:
let project = loadPreviousSelectedCurrentProject();
-
generateStructure(project, isRoot)¶ This function generates the tree structure of a project.
Arguments: - project (Project) – project object
- isRoot (boolean) – true
Returns: file – - the tree structure
-
getCurrentProject()¶ Get the current project structure.
The getFromStore function is called to load the content of the currentProject variable from the projects store.
Returns: Project – project object
Files and Folders
-
newFile(project, name, data)¶ This function creates a new file inside a project. For this, it is required that we know the project for which the new file is generated, the name that the file will have (actually represented by the absolute path to where the file will be created), and, if necessary, the information that will be written in the file.
This option is valid only in the Advanced Mode.
Arguments: - project (Project) – project object
- name (string) – path to where to create the file
- data (string) – data to be written to file
Returns: boolean – true if succsesful, false otherwise
Examples:
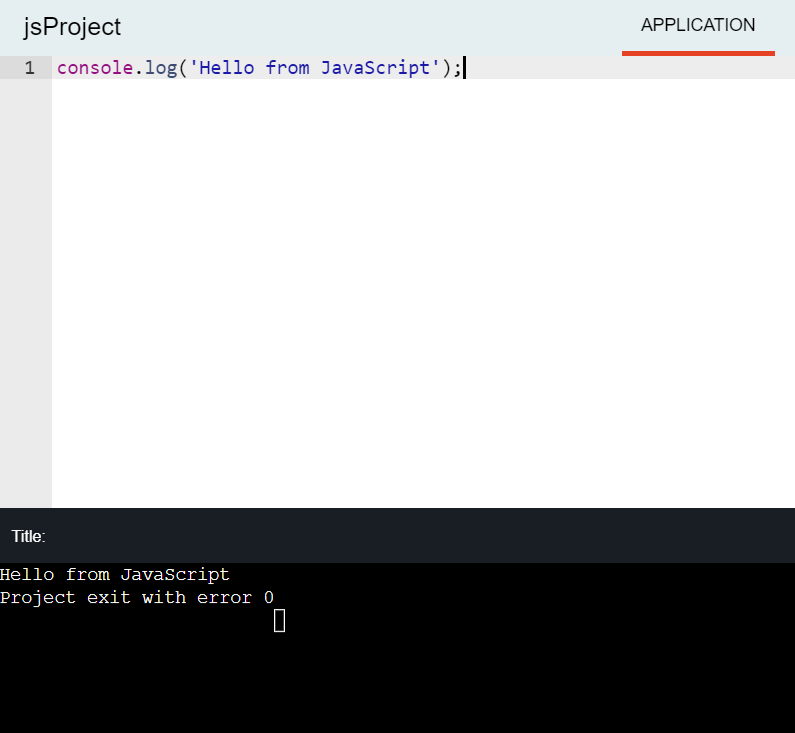
newFile(project, '/main.js', 'console.log(\'Hello from JavaScript\');');
-
deleteFile(project, pathTo)¶ This function is used to delete a file from a project, and it needs the project containing the selected file and the path to that file.
Arguments: - project (Project) – project object
- pathTo (string) – path to the file
Returns: boolean – true if succsesful, false otherwise
Examples:
deleteFile(project, '/folder/file');
-
saveFile(project, name, buffer)¶ The purpose of this function is to save a file. It requires the project in which the file resides, the name of the file, actually represented as the path to the file, and a buffer containing the data that will be saved in the created file.
Arguments: - project (Project) – project object
- name (string) – path to file
- buffer (string) – file buffer to be saved
Returns: boolean – - true if successful, false otherwise
Examples:
saveFile(project, '/folder/file', Buffer.from ('...'));
-
loadFile(project, name)¶ This function loads the content of a file that was previously saved. In order to open the file, it’s needed to know the project that the file belongs to, and the full name of the file, meaning its path.
Arguments: - project (Project) – project object
- name (string) – full file name with path
Returns: Object – - file content
Examples:
let fileContent = loadFile(project, 'FileName');
-
changeFile(project, name)¶ Changes the current file to another one.
Arguments: - project (Project) – project object
- name (string) – path to file
-
saveSpecialFile(project, name, content)¶ The purpose of this function is to save a special settings file and it requires the project corresponding to the file, the name of the file, actually represented as the path to the file, and the content that will be saved in the special settings file.
Arguments: - project (Project) – project object
- name (string) – the path to the file
- content (Buffer) – the content of the file
Returns: boolean – - true if successful, false otherwise
Examples:
saveSpecialFile(project, 'SpecialFileName', Buffer.from ('...'));
-
loadSpecialFile(project, name)¶ This function loads the content of a special settings file that was previously saved. In order to open the file, it’s needed to know the project that the file belongs to, and the full name of the file, meaning its path.
Arguments: - project (Project) – project object
- name (string) – the path to the file
Returns: Buffer – - the content of the special settings file, null otherwise
Examples:
loadSpecialFile('MyNewProject', 'SpecialFileName');
-
getDefaultFileName(project)¶ The purpose of this function is to obtain the default file name of a project.
Usually, the name of this file is ‘main.ext’, where ext is the extension corresponding to the programming language that defines the project.
Arguments: - project (Project) – project object
Returns: string – - name of the default file
-
getDefaultRunFileName(project)¶ Get the default run file name of a project.
Usually, the name of this file is ‘main.ext’, where ext is the extension corresponding to the programming language that defines the project.
Arguments: - project (Project) – project object
Returns: string – - name of the default run file
-
getMakefile(project)¶ This function’s purpose is to get the makefile for file name of a project.
Arguments: - project (Project) – project object
Returns: string – - name of the makefile
-
getFileCode(project, path)¶ This functions returns the code that was written into a file and it needs the project where the file is saved and the path to the file.
Arguments: - project (Project) – project object
- path (string) – the path to the file
Returns: Object – - the current file code
-
getCurrentFileCode()¶ Similar to the one defined before, this function also returns the code, but this time from the current file that is opened in the current project.
Returns: Object – - the current file code
-
newFolder(project, name)¶ This function creates a new folder inside a project. For this, it is required that we know the project for which the new folder is generated and the name that the folder will have. The name is actually represented by the absolute path to where the folder will be created.
This option is valid only in the Advanced Mode.
Arguments: - project (Project) – Project object
- name (string) – path to where to create the folder
Returns: boolean – true if succsesful, false otherwise
Examples:
newFolder(project, '/folder/folder2');
-
deleteFolder(project, pathTo)¶ This function is used to delete a folder from a project, and it needs the project containing the selected folder and the path to that folder.
Arguments: - project (Project) – project object
- pathTo (string) – path to the folder
Returns: boolean – true if succsesful, false otherwise
Examples:
deleteFolder(project, '/folder/folder2');
-
renameObject(project, newName, pathTo)¶ This function is used to rename a file or a folder included in the currently open project.
It’s required to know the project for which the change is made, the new name that will correspond to the selected object and the path to the file/folder to be renamed.
Available only for the Advanced Mode, this function is called when the user choses the Rename option in the menu that shows up by right clicking on a folder/file.
Arguments: - project (Project) – project object
- newName (string) – new name
- pathTo (string) – path to existing file/folder
Returns: boolean – true if succsesful, false otherwise
Examples:
renameObject(project, 'ObjectNewName', '/folder/file');
Dashboard Graphs Plugins
The purpose of the dashboard plugins is to create a collection of graphs that update their values according to the signals received from a connected device.
The main plugin, “dashboard”, designs the Dashboard tab, which contains the list with the graphs that the user can draw, but it also serves as a store, where the states and values of the graphs are managed.
Inside the index.js file, we created the registerGraph function, that registers a graph component, with its data, options and settings, and constantly updates the graphs array in the dashboard store. The parameters of this function are:
| Parameter title | Description |
| name | graph label, translatable string |
| priority | graph priority in the list of all graphs, lower means higher in the list of all graphs |
| iconURL | the relative path to the image representing the graph |
| component | the Vue component to display when the user chooses to draw a graph |
| options | additional options |
Also here we create the functions registerForSignal and emitSignal, that will be used by the graphs and the connected device.
Here’s a list of the graphs that are currently available in the application: Gauge, Line, Speedometer, Thermometer, Vumeter, Switch, Slider, Extra.
Each dashboard graph represents a new plugin, named “dashboard.graph.name”, where name represents the actual name of the graph.
The views folder contains 2 Vue components:
- NameDialog.vue, where we design the dialog opened when the user clicks on one graph from the list, allowing to customize the options and settings
- NameGraph.vue, where we use the vue2-highcharts module to draw a graph, according to the data entered by the user in the dialog; more details about the available Highcharts and the parameters required for each chart can be found here.
The index.js file of each graph has the purpose to call the registerGraph function from the main plugin dashboard, where the component parameter is the NameGraph Vue component, and the options parameter is represented by on object where we define the setup property. Here, we call a function that opens the NameDialog component and updates each graph’s setup options according to the data inputted by the user.
Of course, in the package.json file we have to specify that each dashboard.graph plugin consumes the main dashboard plugin.
Pin Layout plugin
The Pin Layout tab becomes visible for a user only when a board is connected to Wyliodrin STUDIO, and it loads a “map” of the board and a legend of its pins. As we described in the How to add a wyapp board section, when we register this type of device, we call the registerPinLayout function.
-
registerPinLayout(type, board, img)¶ This function registers a customized pin layout image for the connected device. It’s called each time you create a plugin for a new type of board. Depending on the type of the device or on the name of the board, the purpose of this function is to display the specified image within the Pin Layout tab.
Arguments: - type (string) – device type
- board (string) – board name
- img (string) – path to the pin layout image
For example, if you want to register a Raspberry Pi board, inside the corresponding plugin you will call this function:
studio.pin_layout.registerPinLayout ('wyapp', 'raspberrypi', 'plugins/devices/wyapp/devices/raspberrypi/data/img/pins-raspberrypi.png');
In this situation, the program will search for a device that has the ‘wyapp’ type, and the name of the corresponding board ‘raspberrypi’.
However, you can register a pin layout only for a device type, and the selected image will be available for every device that has that type, no matter the name of the board:
studio.pin_layout.registerPinLayout ('wyapp', '', 'plugins/devices/wyapp/devices/raspberrypi/data/img/pins-raspberrypi.png');
Once a Raspberry Pi board is connected to Wyliodrin STUDIO, the Pin Layout tab will become available, and its content will be:
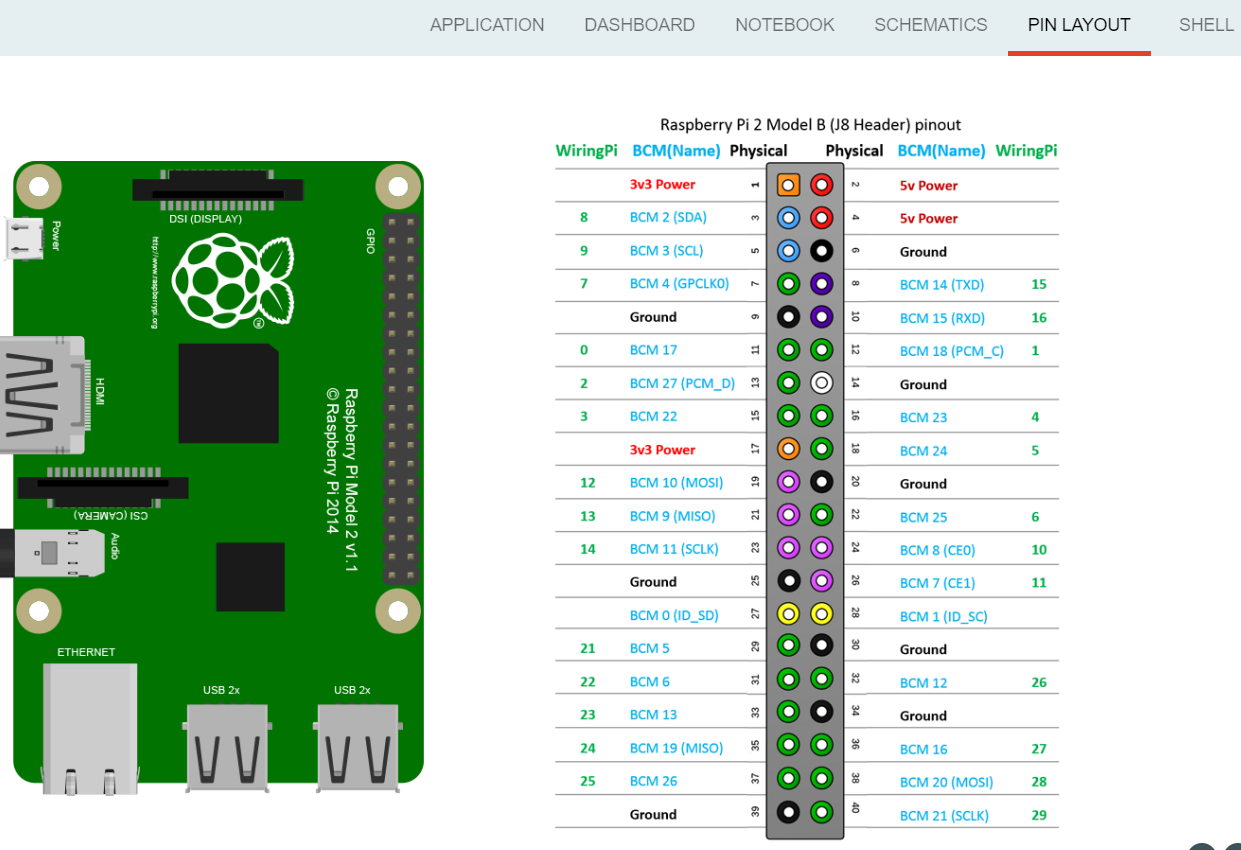
The Vue component of this plugin, PinLayout.vue, is designed to change the pin layout image dynamically, according to the device type and board, and to become enabled/disabled, depending on the status of the device (CONNECTED / DISCONNECTED).
Console and Shell plugins
Both the Console and the Shell plugins depend on the xterm plugin.
The “xterm” plugin uses the xterm module in order to register a terminal that will allow the user to interact with a connected board.
The terminal has 2 implemented buttons:
- clear: clear the content of the terminal
- reset: reboot the terminal
Both functions belong to the xterm Terminal, that is initialized when a device is connected. If there is no connected device, the terminal won’t allow the user access and a replacement text will be displayed.
The Xterm Terminal functioning is based on events.
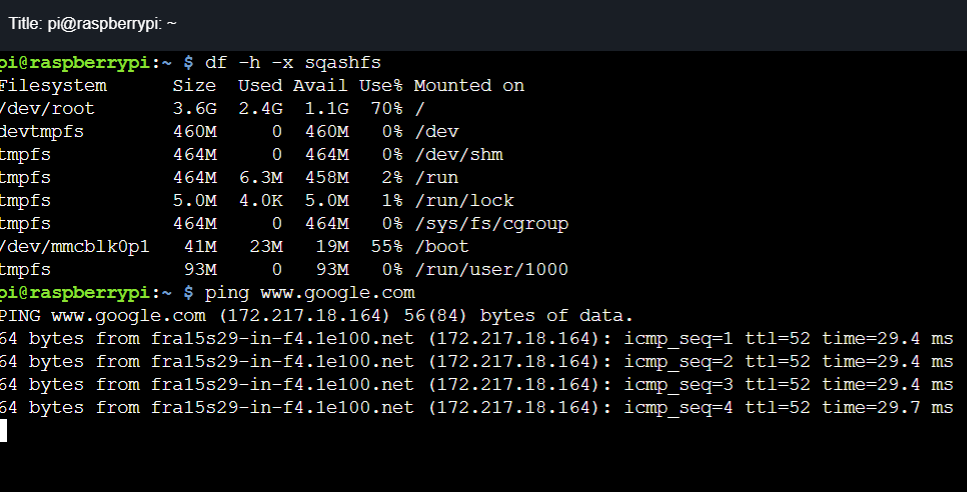
The title of the terminal is applied when a device is connected and it changes dynamically, according to the type of the board. For example, if a Raspberry Pi board is connected, the title will be detected and automatically set to the terminal as pi@raspberrypi.
When the user starts typing commands in the terminal, the write function is called in order to save all the inputted data into a buffer, unique for each terminal. We also retain the cursor position, to write the characters successively.
Another event is to resize the terminal and it has to be done at each update. The resizing action supposes to set the geometry of the terminal (number of columns and rows).
Both console and shell plugins have the functionalities of the described Terminal, so they have to consume the xterm plugin. However, there is a certain difference between the 2 components:
The purpose of the Console is to display a terminal that allows you to see the output of the projects that you run in the Application tab.
The Shell terminal represents the main component of the Shell tab, that allows you to send command directly to the board.
Settings Plugin
The “settings” plugin consumes our filesystem plugin in order to save special files that contain various settings for our plugins. The filesystem is implemented differently for each version of the Wyliodrin STUDIO application, but the main idea is to manage all the files and folders used inside the program.
In order to obtain the data that was written into a special settings file, we need to read the content of this file located inside a special settings folder.
The main functions of the settings plugin are:
-
storeSettings(plugin, data)¶ Save plugin settings.
For each plugin that this function is called for, we create an object with the data that will be stored and we use the filesystem function writeFile to save the parsed content into the SETTINGS_FILE
Arguments: - plugin (string) – plugin name
- data (Object) – plugin data
-
loadSettings(plugin)¶ Load plugin settings.
For the selected plugin, we display the data saved inside the special settings file.
Arguments: - plugin (string) – plugin name
Returns: Object – - the data inside the settings file
-
loadValue(plugin, name, value)¶ Load value from settings.
We first load the settings from a chosen plugin using the loadSettings function. If the setting object exists and if there is a value for the chosen name property, we return that value.
Arguments: - plugin (string) – plugin name
- name (string) – property name
- value (Object) – the value to be associated to the property
Returns: string – - the value in the settings file
-
storeValue(plugin, name, value)¶ Store value to settings.
The function first loads the existing settings of the selected project, then updates the chosen property of the object with the value.
Arguments: - plugin (string) – plugin name
- name (string) – property name
- value (Object) – the value to be associated to the property